

If you’re a tile installer you’re well aware of how difficult it is to properly set flexible large format heavy or low-thickness tiles because often times the floor foundation is uneven and/or contains imperfections. To make matters worse tiles that seemed uniformly levelled while first installing them result in tiles that show differences as the tile adhesive sets compromising the overall aesthetics of your initial hard work.
With the Raimondi Leveling Spacers this potential is no longer a threat to your perfect tile project. In addition to ensuring the proper leveling of tiles this system helps speed the tile setting process
TILE COVERAGE:
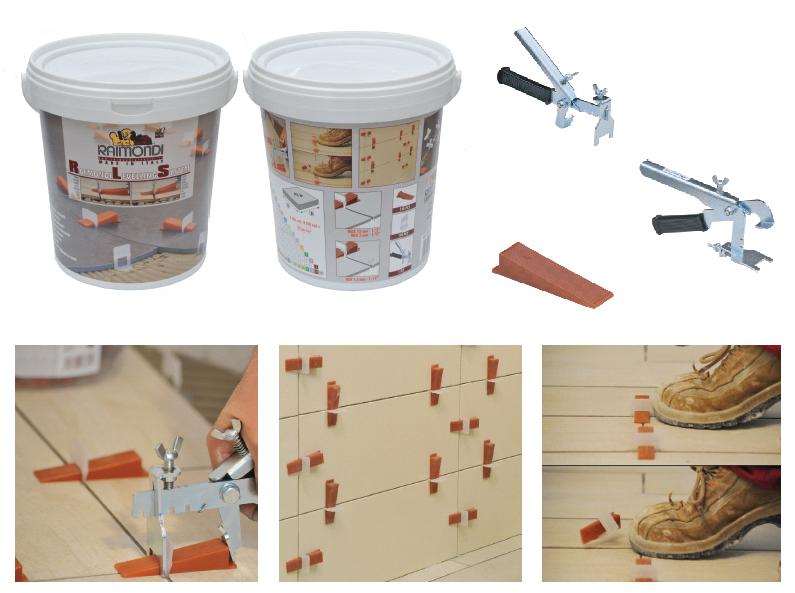
The Raimondi Tile Leveling System’s Standard Kit comes with: 1 RLS floor pliers 100 spacers and 100 wedges. The wedges can be used over and over again so you’ll only need as many wedges as you can set in 1 day. The spacer clips that are needed will depend largely on how big and thick the individual tiles are for your project as well as your tile layout pattern.
HOW TO USE:
STEP 1
After spreading your tile adhesive insert leveling spacer underneath the tiles along the 4 sides use traditional spacers as you normally would to square up the corners. For larger tiles it may be necessary to “double up” using 2 leveling spacers for each side.
STEP 2
Set the tile and beat it with a rubber mallet
STEP 3
Use the special traction-adjustable pliers to insert the wedge into the leveling spacers paying attention not to pass the breakpoint.
STEP 4
Once the tile adhesive has been allowed to set. Remove the leveling spacers with the traction-adjustable pliers rubber mallet or kicking them out with your feet.
Be the first to review “Raimondi Levelling System”
You must be logged in to post a review.
Related products

Tiling Tools

Tiling Tools

Tiling Tools

Tiling Tools

Tiling Tools
Tiling Tools

Tiling Tools

Tiling Tools
Reviews
There are no reviews yet.